#Authorization and authentication
#Overview
This guide will give you information about OAuth 2.0 and the OpenID concept that you will need when starting the development of your App.
By following the “getting started” sections below, we will walk you through each of these concepts in a step by step process.
If you simply want to bootstrap an App with predefined authorization scopes to start your development, follow our Sample Apps.
#Authorization vs authentication
Authorization is the process of giving permissions to apps. Akeneo users authorize apps to access data in Akeneo Product Cloud. For example, an app might be authorized to access product and asset data in Akeneo Product Cloud.
Authentication is the process of verifying the identity of the user or the app. To keep transactions safe and secure, all apps connecting with Akeneo API must authenticate when making API requests.
#Types of authorization and authentication methods
- Akeneo Product Cloud uses OAuth 2.0 to manage app authorizations.
- Any app can use the OpenID Connect protocol to authenticate users coming from Akeneo Product Cloud.
#OAuth 2.0
OAuth 2.0 is the industry-standard protocol for authorizing or giving permissions to apps. This differs from authentication, which is the process of verifying the identity of the user or the app.
#The OAuth 2.0 flow
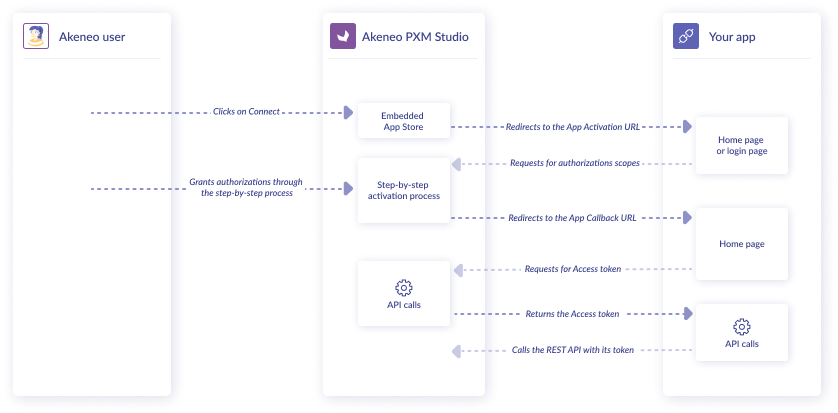
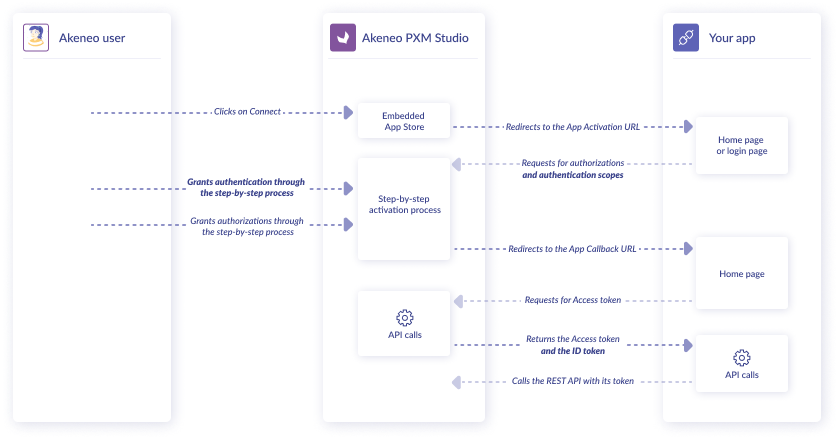
Akeneo uses OAuth 2.0’s authorization code grant flow to issue access tokens on behalf of users. The OAuth flow is used so that Akeneo users can authorize Akeneo apps to access data in Akeneo Product Cloud. For example, an app might be authorized to access product and asset data in a store.
The following diagram illustrates the OAuth flow based on the actions of the Akeneo user, your app, and Akeneo Product Cloud:
#Getting started with OAuth 2.0
Apps created in the Akeneo App Store must obtain authorization using the OAuth 2.0 specification to use Akeneo’s API resources. This guide shows you how to authorize an app using OAuth 2.0.
#What you'll learn
After you've completed this tutorial, you'll be able to authorize an app created in the Akeneo App Store using OAuth 2.0.
#Requirements
- You have access to an Akeneo Product Cloud sandbox (Please refer to our App developer starter kit)
- You're familiar with the OAuth 2.0 flow in Akeneo
#Step 1: Generate API credentials
The first step is to retrieve a Client id and a Client secret, which you get when you create an app. These API credentials identify your app during the authorization process.
If you've already created an app and generated API credentials, then proceed to step 2.
If you start developing your app, we advise you to use a custom app. To do so:
- In the top right corner, click on
Create an App - Fill in all the required information: Activate URL and Callback URL
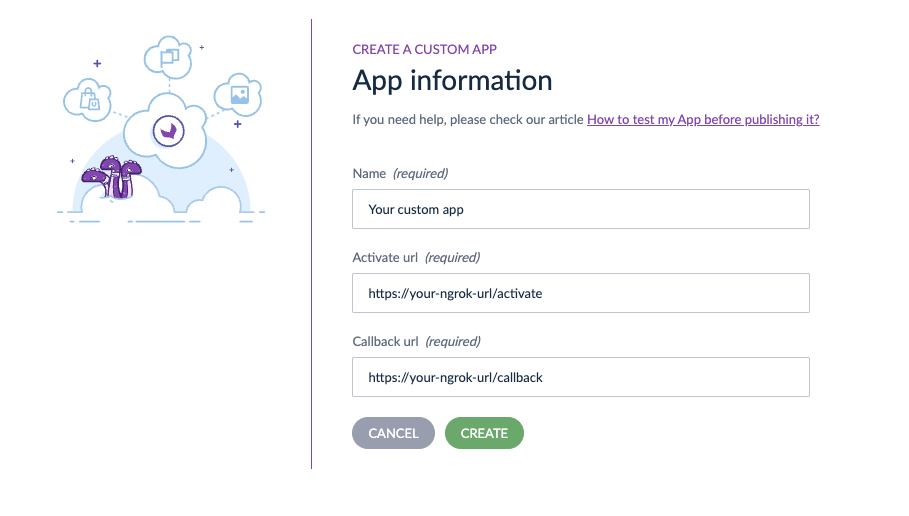
- Then click on
Create - Copy/paste credentials in your app configuration file
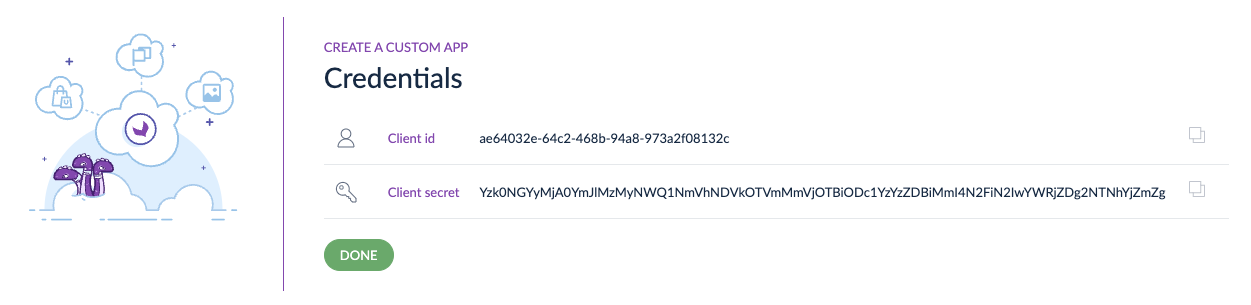
- And click on
Done - Your custom App appears on the App Store page
Your app is good to go? Connect to the App Portal and follow the Create an app record documentation.
#Step 2: Ask for authorizations
Before an app can access data, a user must grant authorizations and permissions to the app. It happens when a user clicks the Connect button to connect your app.
After a user clicks on Connect, they are redirected to the activation URL you provided. The Akeneo Product Cloud URL they come from is in the query you receive.
https://my-app.example.com/oauth/activate?pim_url=https%3A%2F%2Fmy-pim.cloud.akeneo.com
When you are ready to do so, you must start the Authorization Request.
Like any other OAuth 2.0 application, you have to redirect the user to the Authorization Server (Akeneo Product Cloud) with the following parameters:
| Query parameter | Description |
|---|---|
response_type |
Required. Must always be "code" |
client_id |
Required. The client id you get from the Akeneo App Store |
scope |
Optional. A space-separated list of scopes. For example, to write products and read assets, use scope=write_products read_assets. Any permission to write a resource includes the permission to read it. |
state |
Recommended. |
    https://my-pim.cloud.akeneo.com/connect/apps/v1/authorize?
        response_type=code&
        client_id=[OAUTH_CLIENT_ID]&
        scope=[REQUESTED_SCOPES]&
        state=[STATE]
To discover all the authorization scopes, please refer to the Authorization and authentication scopes section.
To protect your App from cross-site request forgery, you should send a random string in the state parameter.
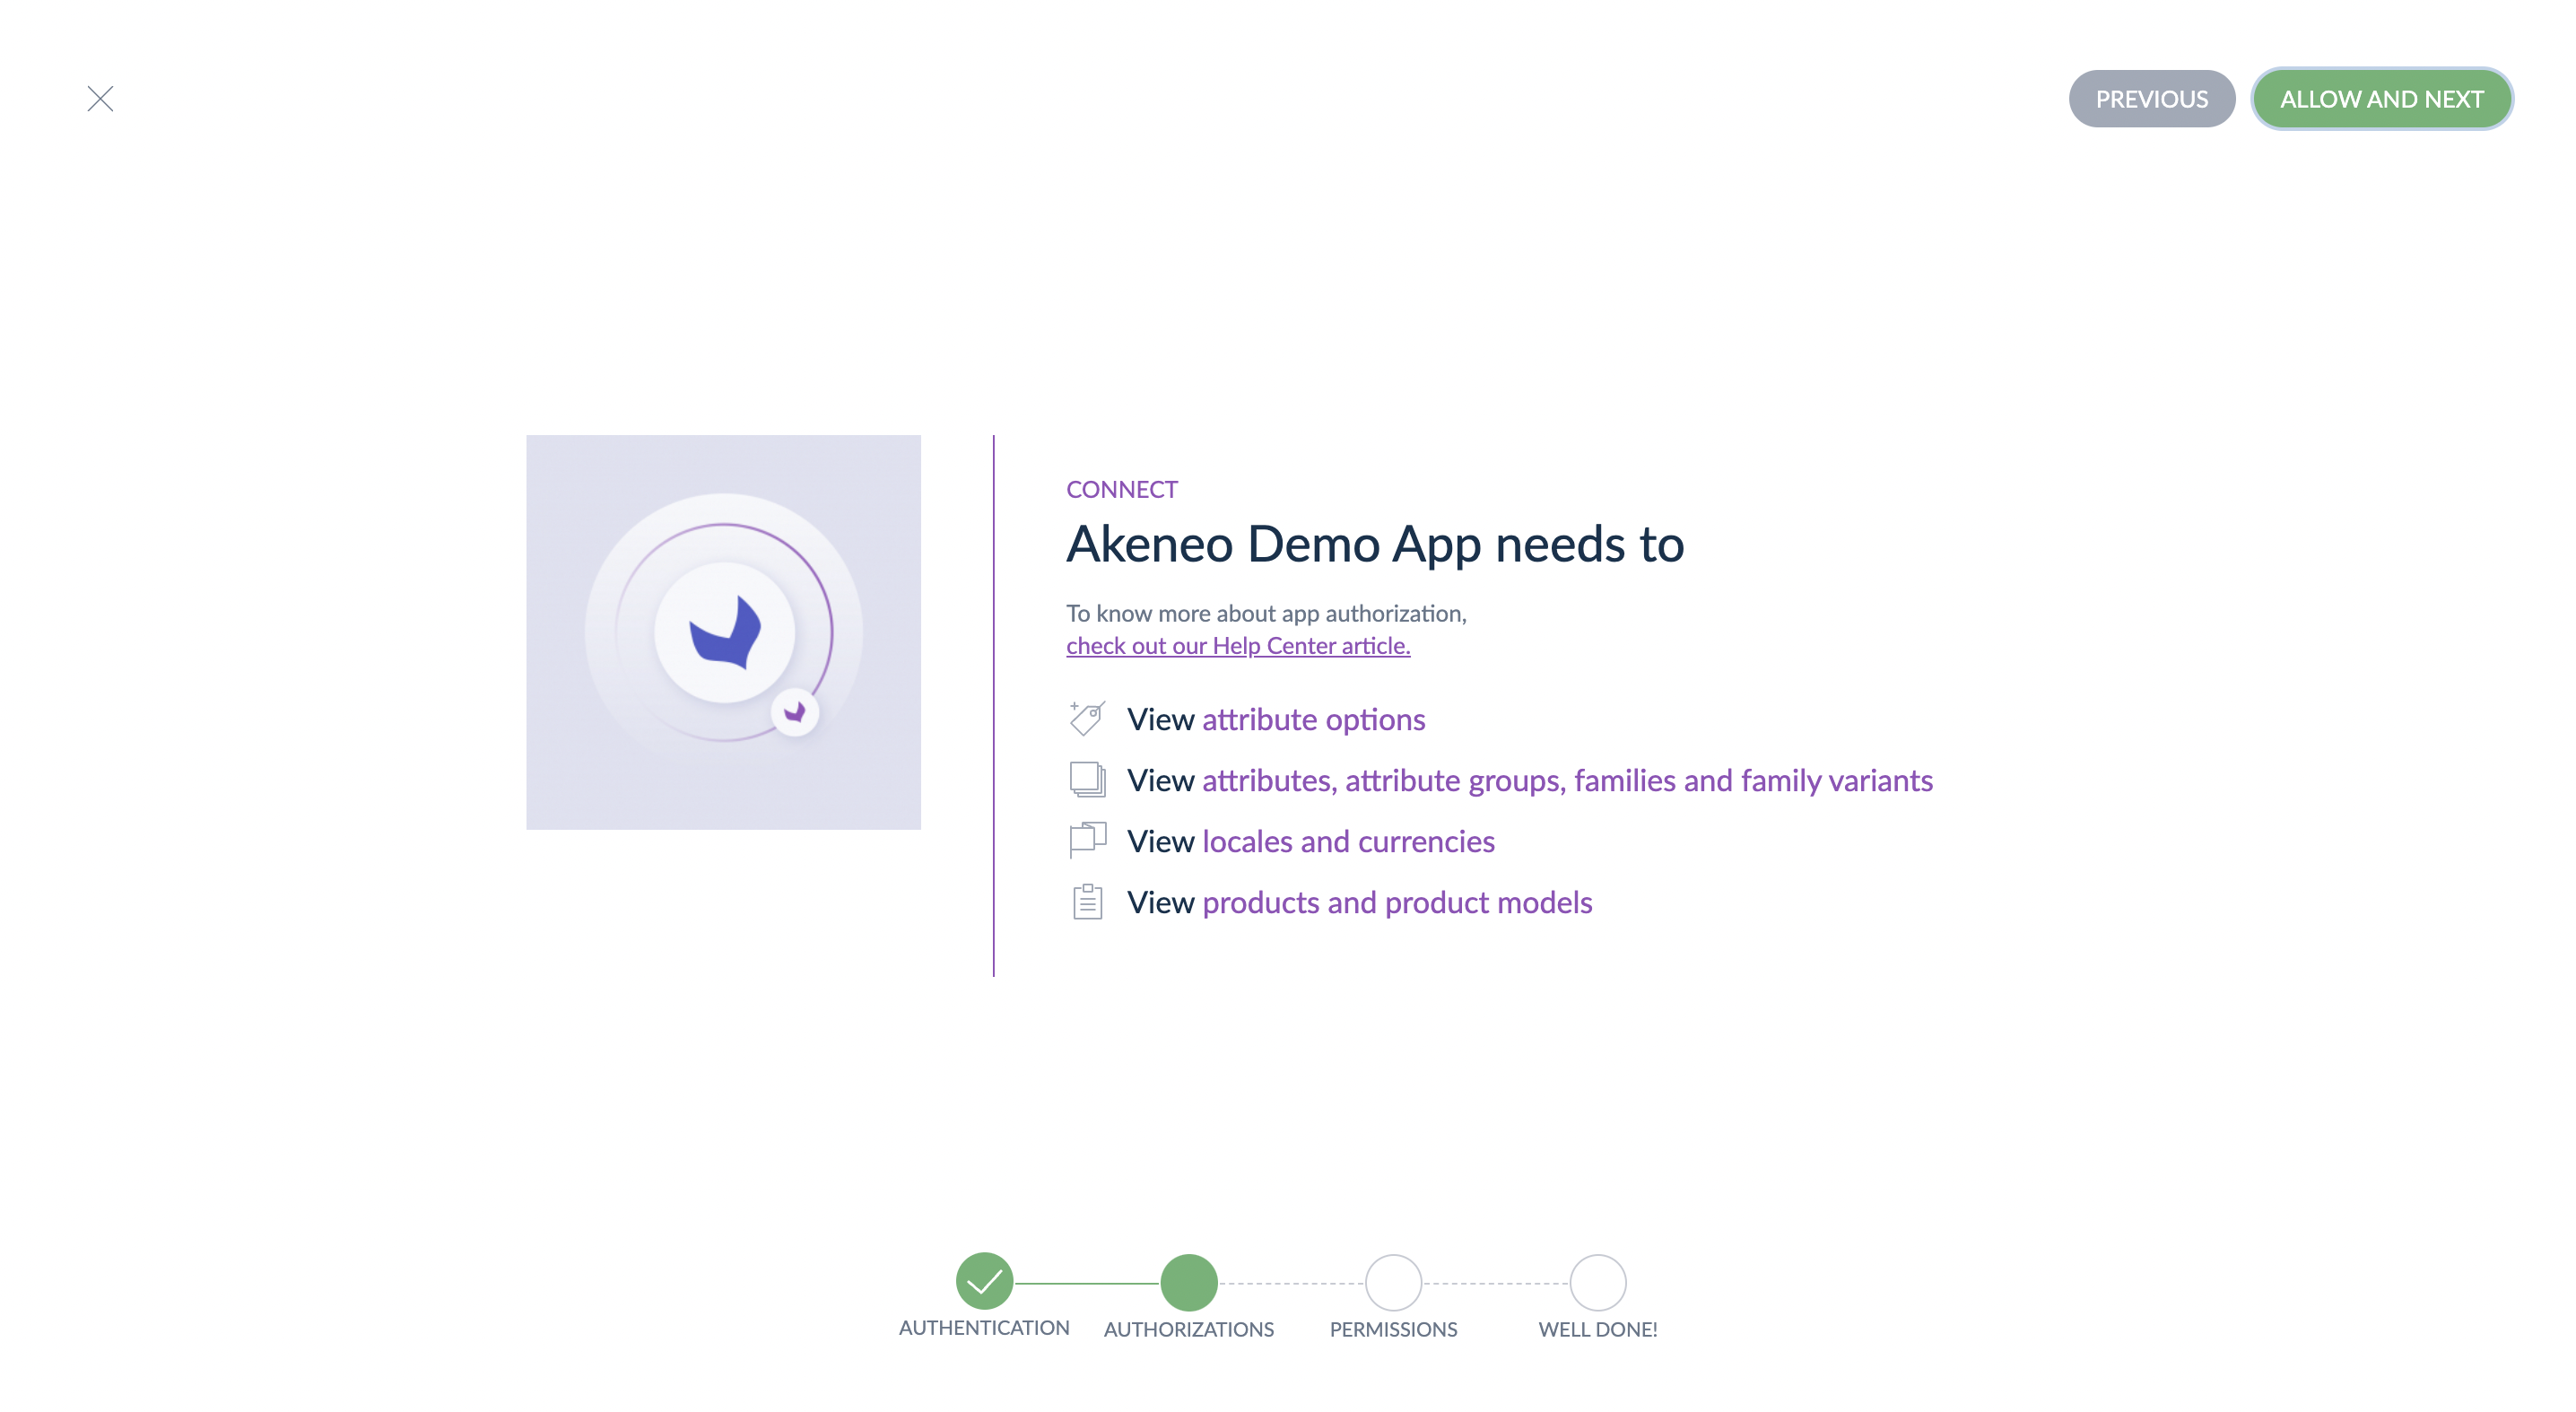
When the user arrives at this URL, Akeneo shows the following prompt to receive authorization from the user:
When the user ends the connection process, they are redirected to the app callback URL with the following parameters:
    https://my-app.example.com/oauth/callback?
        code=[AUTHORIZATION_CODE]&
        state=[STATE]
If you used a state to protect your App from cross-site request forgery, you must validate that the received
state is identical.
#Step 3: Get a permanent access token
Now that you have received an authorization code, you can exchange this code against an access token.
The PIM expects the following parameters in the request:
client_id(required)code(required)grant_type(required, must always be "authorization_code")code_identifier(required)code_challenge(required)
#What's the Code Challenge?
To validate the App identity, Akeneo PIM requires a unique code challenge for each Access Token Request, instead of the usual client secret. The code challenge is composed of 2 keys:
code_identifier: high-entropy cryptographic random stringcode_challenge: sha256 hash of the concatenation ofcode_identifierandclient_secret
Here is a PHP example:
$codeIdentifier = bin2hex(random_bytes(30));
    $codeChallenge = hash('sha256', $codeIdentifier . '[CLIENT_SECRET]');
#Token Request
From your server, you must make the following request to the PIM REST API
on the endpoint /connect/apps/v1/oauth2/token:
POST /connect/apps/v1/oauth2/token HTTP/1.1
    Host: my-pim.cloud.akeneo.com
    Content-Type: application/x-www-form-urlencoded

    client_id=[OAUTH_CLIENT_ID]&code_identifier=[CODE_IDENTIFIER]&code_challenge=[CODE_CHALLENGE]
    &code=[AUTHORIZATION_CODE]&grant_type=authorization_code
#Token Success Response
If your Access Token Request is accepted, you will receive a JSON response with the token:
{
      "access_token": "Y2YyYjM1ZjMyMmZlZmE5Yzg0OTNiYjRjZTJjNjk0ZTUxYTE0NWI5Zm",
      "token_type": "bearer",
      "scope": "read_products write_products"
    }
You must store the access token securely. If you need to ask for a new one, you have to go through the same steps and wait for the PIM user to manually grant you a new access token.
An Access Token given to an App has no expiration date. However, be aware that it can be revoked at any moment by a PIM user.
#Token Error Response
If your Access Token Request is refused, you will receive a JSON response with the error.
For example, if your app doesn’t retrieve its access token within a 30 seconds delay, you will receive the following error, which indicates that your code is no longer valid.
{
        "error": "invalid_grant",
        "error_description": "Code has expired"
    }
Check the OAuth 2.0 spec for the possible error codes.
#Step 4: Make authenticated requests
After your app has obtained an API access token, it can make authenticated requests to the REST API.
These requests are accompanied by a header Authorization: Bearer {access_token} where {access_token} is replaced with the permanent token.
The following examples show how to retrieve a list of products using the REST API.
#Next steps
- Learn how to use Open ID connect to authenticate users
- Explore the REST API reference
#Getting started with OpenID Connect
OpenID Connect is a protocol that allows you to automatically authenticate users from the Akeneo Product Cloud on your app.
This is particularly useful for identifying the PIM user who will be connecting to your app for the first time, but also for identifying the different PIM users who will open and use your app.
This protocol will help you set up dedicated user profiles, and even specific configurations for each user.
OpenID Connect is a simple identity layer on top of the OAuth 2.0 protocol. Basically, with OpenID Connect, you use the same process as for Authorization, but you request an additional scope and you receive, alongside the Access Token, an ID Token containing the information of the current user.
This is an optional feature in Apps, you can also use your own Authentication. Learn more about the OpenID Connect protocol.
#What you'll learn
After you've completed this tutorial, you'll be able to authenticate users coming from Akeneo Product Cloud using OpenID Connect.
#Requirements
- You have access to an Akeneo Product Cloud sandbox (Please refer to our App Developer Starter kit)
- You're familiar with OpenID connect
- You're familiar with the app authentication process
#Why use OpenID for your App
OpenID feature is a facilitator:
- To the user who can log into the App directly by clicking “Open App” in the Connected Apps section of the PIM without any authentication form to complete
- To your App building experience as the PIM user's information (last name, first name, email) are retrieved automatically
- You can use those data in the UI to personalize some parts of your App. Example: “Welcome Peter”
Advice / Attention points
- Never trust the “first name”, “last name” or “email” value as a golden record, any user can update this data, and most importantly the email is not verified by Akeneo PIM.
- The
subclaim is the value you need to use to identify a specific User in the PIM.- This value respects the OpenID spec, it is a PPID.
Pairwise pseudonymous identifiers (PPIDs) are defined in the OpenID Connect standard for representing users with opaque and random identifiers that are unique to different clients for increased user privacy.
#Step 1: Ask for authentication scopes
When a user connects to your app for the first time, and you want to authenticate them, you must ask for OpenID scopes during the Authorization request.
https://my-pim.cloud.akeneo.com/connect/apps/v1/authorize?
            response_type=code&
            client_id=[OAUTH_CLIENT_ID]&
            scope=openid email profile read_products write_products&
            state=[STATE]
Learn more about available authentication scopes.
If a user tries to access your App from their Akeneo Product Cloud, and you want to authenticate them, start an Authorization request, even if you already are connected to their Akeneo Product Cloud.
During this new Authorization Request, you must request all the scopes your App needs, including the Authorization scopes, in addition to the OpenID scopes.
#Step 2: Extract user information
At the end of the OAuth 2.0 process, if your Access Token Request is accepted, you will receive a JSON response with both tokens:
{
      "access_token": "Y2YyYjM1ZjMyMmZlZmE5Yzg0OTNiYjRjZTJjNjk0ZTUxYTE0NWI5Zm",
      "token_type": "bearer",
      "scope": "openid email profile read_products write_products",
      "id_token": "eyJ0eXAiOiJKV1QiLCJhbGciOiJSUzI1NiJ9.eyJpc3MiOiJodHRwOi8vM.XcmmANmSC2RHqWOI"
    }
#Decoding the ID Token
An ID Token is a JWT composed of 3 parts encoded independently in base64: header.payload.signature.
We recommend using one of the libraries listed here with support for RS256 to decode it
and retrieve the values inside the payload.
It's not recommended to try to decode and verify the ID Token yourself.
#Payload
Once you've decoded the payload, it will look like this:
{
      "iss": "https://my-pim.cloud.akeneo.com",
      "jti": "c76d558d-d10a-4bac-b320-12c22e36b3db",
      "sub": "c6acd619-8a08-46c2-9a5e-41a175d9149d",
      "aud": "206f450e-09a1-44ed-a0b3-9dd80f980ace",
      "iat": 1643029678.467703,
      "exp": 1643033278.467703,
      "email": "john.doe@example.com",
      "email_verified": false,
      "firstname": "John",
      "lastname": "Doe"
    }
| Field | Description |
|---|---|
iss |
URL of the token issuer |
jti |
Unique identifier for the token |
sub |
Unique user id |
aud |
Id of the OAuth 2.0 client |
iat |
Timestamp of token creation |
exp |
Timestamp of token expiration |
email |
(optional) Email of the user |
email_verified |
(optional) Boolean to indicate email validity |
firstname |
(optional) Firstname of the user |
lastname |
(optional) Lastname of the user |
Additional information (email, firstname, lastname, ...) are only present if you requested the corresponding
authentication scopes and those were approved by the user.
email, firstname and lastname are values that can be edited on Akeneo PIM and are not verified by
Akeneo (email_verified is always false as a result). The only value that will truly identify a user is their unique user id in the subject claim (sub).
#Signature
The ID Token sent by Akeneo PIM contains a signature, and you must verify it to guarantee that the payload has not be tampered with.
To validate the signature, you must retrieve the public key available at the
URL {PIM}/connect/apps/v1/openid/public-key.
Then, follow the instructions of the library you are using.
The pair of private/public keys are regenerated regularly for security reasons. You should always retrieve the latest public key when validating a signature.
#Next steps
- Learn about catalogs
- Explore the REST API reference, the GraphQL API and the Event Platform.
#Authorization and authentication scopes
In this part of the documentation, you'll find all the available scopes. These are the scopes you send in the authorization and authentication requests.
#Available authorization scopes
| Scope | Grants access to |
|---|---|
read_products |
Read products |
write_products |
Write products |
delete_products |
Remove products |
read_catalog_structure |
Read attributes, attribute groups, families and family variants |
write_catalog_structure |
Write attributes, attribute groups, families and family variants |
read_attribute_options |
Read attribute options |
write_attribute_options |
Write attribute options |
read_categories |
Read categories |
write_categories |
Write categories |
read_channel_localization |
Read locales and currencies |
read_channel_settings |
Read channels |
write_channel_settings |
Write channels |
read_association_types |
Read association types |
write_association_types |
Write association types |
read_catalogs |
Read app catalogs |
write_catalogs |
Write app catalogs |
delete_catalogs |
Remove app catalogs |
read_asset_families EE |
Read asset families |
write_asset_families EE |
Write assets families |
read_assets EE |
Read assets |
write_assets EE |
Write assets |
delete_assets EE |
Remove assets |
read_reference_entities EE |
Read reference entities |
write_reference_entities EE |
Write reference entities |
read_reference_entity_records EE |
Read reference entity records |
write_reference_entity_records EE |
Write reference entity records |
read_workflows EE |
Read workflows and their steps |
read_workflow_step_assignees EE |
Read assignees for workflow steps |
read_workflow_tasks EE |
Read workflow tasks |
write_workflow_tasks EE |
Write workflow tasks |
create_suggestions EE |
Create suggestions |
read_suggestions EE |
Read suggestions |
manage_suggestions EE |
Manage suggestions |
#Available authentication scopes
| Scope | Grants access to |
|---|---|
openid |
Read user id |
profile |
Read user first name and last name (from PIM user profile) |
email |
Read user email (from PIM user profile) |
#Update Authorization and authentication scopes
It's possible to update the access scopes of an already connected app. The access scope update process requires app users to consent to new scopes addition.
#Update the list of required scopes
If your app needs to change the access scopes, it must initiate a new authorization request with all access scopes needed, even the access scopes that are already granted. This new authorization request follows the usual OAuth 2.0 protocol and will end with a new Access Token that reflects updated scopes.
Some users are not allowed to grant new access scopes in the Akeneo PIM. You should not force users to go through the Authorization process if you haven't received the new access scopes, you could end up in an infinite loop. Consequently, your App must be able to function as usual without the new access scopes.
More information on our Help Center: Who can manage and open Apps?
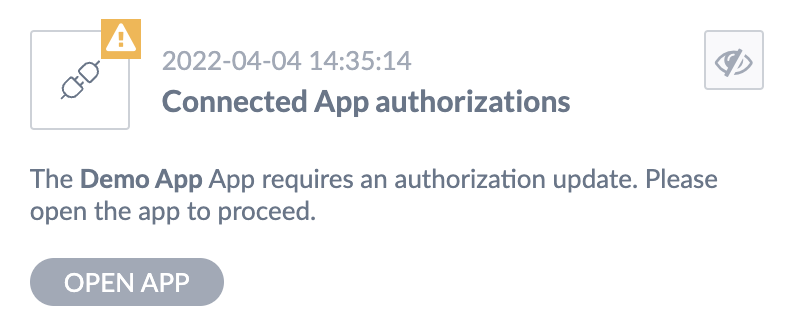
#Notify a PIM your app requires an authorization update
Through Akeneo REST API, connected apps can notify Akeneo PIM users who can manage your app that the authorization scopes your app requires have changed.
To do so, use the following POST method, with parameters below:
https://my-pim.cloud.akeneo.com/connect/apps/v1/scopes/update?scopes=[REQUESTED_SCOPES]
Requirements:
scopes: query parameter to specify app new scope list as a space-separated stringAuthorization: Bearer [AccessToken]: header to authenticate your appContent-Type: application/json: header for the response format
The notification will warn them and entice them to open your app so that you can initiate an authorization request with the entire list of required scopes.
Please, be aware that this endpoint does not update any access scopes. It is only meant to provide a way for an app to warn Akeneo PIM.