#Catalogs for Apps
#Overview
This guide introduces the catalog feature and explains why using catalogs to retrieve Akeneo data.
You will save time during development with catalogs because Akeneo Product Cloud manages your product selection and gives you direct access to the relevant data. You can also leverage our data mapping feature to get product data in your chosen format.
#What's a catalog?
A catalog is a selection of products defined by one or several criteria (families, categories, etc.)
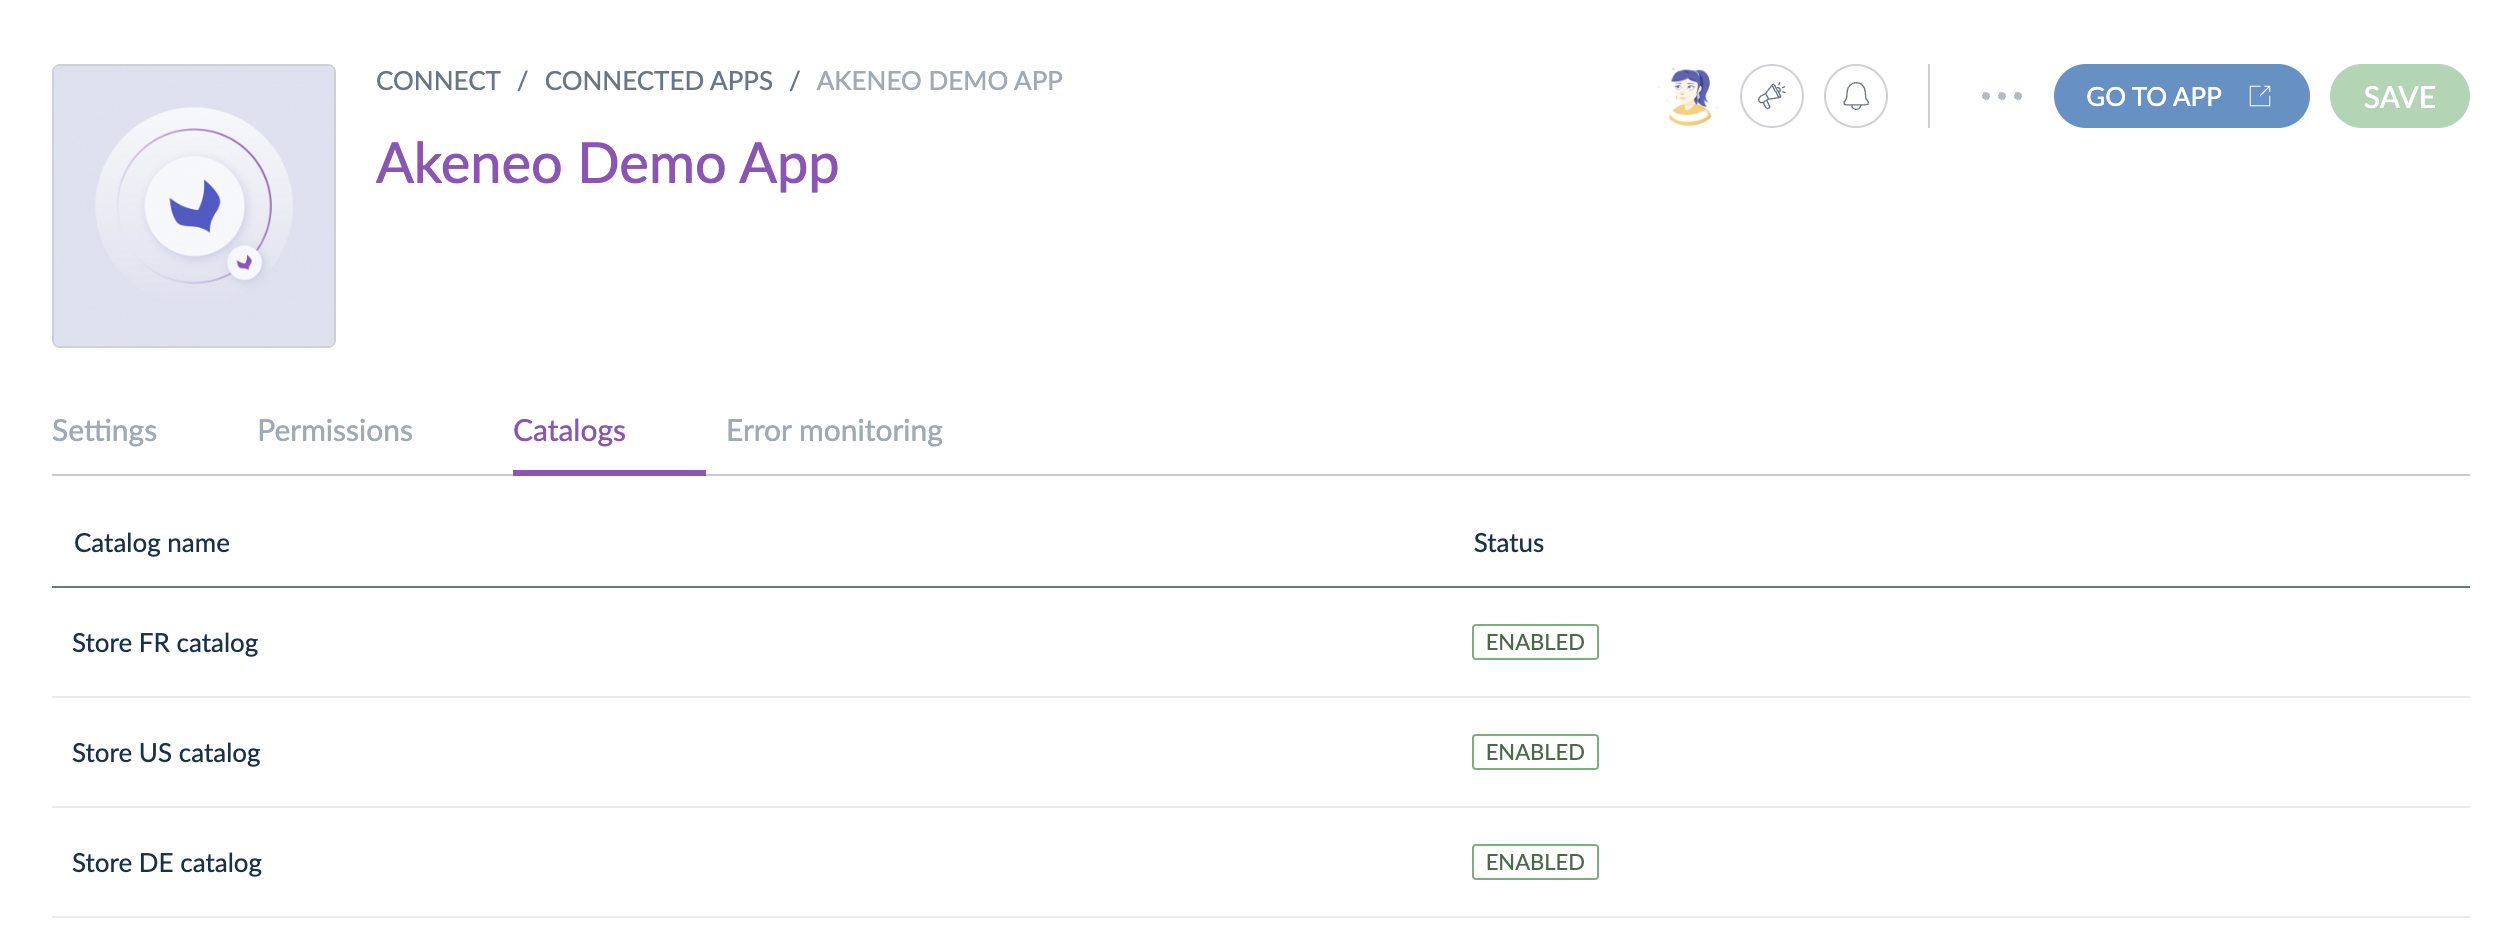
Catalogs are only created by apps and configured by Akeneo users from Akeneo Product Cloud. This feature is only visible if the app manages catalogs.
#Why use catalogs to retrieve product data?
Using Catalogs helps you better manage the product information you get from the Akeneo Product Cloud.
Most of the time, developers must design, develop and maintain a filter interface to allow users to configure their product selection: which products must be considered and which don't. Using catalogs for apps prevents you from adding this filtering interface to your app. When you retrieve product information related to a catalog, you only retrieve the data your app needs to process.
Moreover, with catalogs, you don't have to master the entire PIM structure anymore to deliver a relevant filtering interface, as Akeneo Product Cloud already provides it to your users.

#Limits
To ensure Akeneo Product Cloud remains stable, we added some limits to catalogs:
- Each app can create up to 200 catalogs.
- A product selection can have up to 25 selection criteria.
- A product mapping schema can accommodate up to 600 targets. However, please note that the user interface may experience reduced responsiveness when the number of targets exceeds 200.
To learn more about the functional scope, please visit our Help Center and read the How to configure catalogs for Apps?
#Troubleshooting
#Automatic deactivation of catalogs
When a product selection becomes invalid, e.g., a selected category no longer exists, the PIM automatically disables the catalog.
In that case, your app receives an HTTP 200 response containing the following payload.
    {
      "error": "No products to synchronize. The catalog \"65f5a521-e65c-4d7b-8be8-1f267fa2729c\" has been disabled on the PIM side. Note that you can get catalogs status with the GET /api/rest/v1/catalogs endpoint."
    }
#Next steps
- Learn how to create and use catalogs
- Discover how users configure catalogs in the Akeneo Product Cloud
#Getting started with catalogs
To create and use a catalog, your app has to send some requests to the Akeneo REST API. This guide describes how to use the catalog features with your app.
#What you'll learn
After completing this tutorial, you'll be able to create and use catalogs to retrieve product data.
#Requirements
- You have access to an Akeneo Product Cloud (Please refer to our App developer starter kit)
- Your app already manages the authorization process
#Step 1: Ask for catalog scopes
To manage catalogs, you need to ask for at least 4 scopes:
read_productsread_catalogswrite_catalogsdelete_catalogs
In the documentation Ask for authorizations, you can discover how to ask for scopes.
Once Akeneo users accept these scopes during the app connection, you can manage and use catalogs.
#Step 2: Create catalogs
Once your app is connected and gets the proper authorization, your app can start using catalogs.
To do so, your app has to create a catalog using the Create a new catalog endpoint. When your app creates a catalog, the API returns its UUID. You will use this catalog UUID to get information about the catalog and retrieve related products.
To help your users know how to configure a catalog, give it the most descriptive name possible.
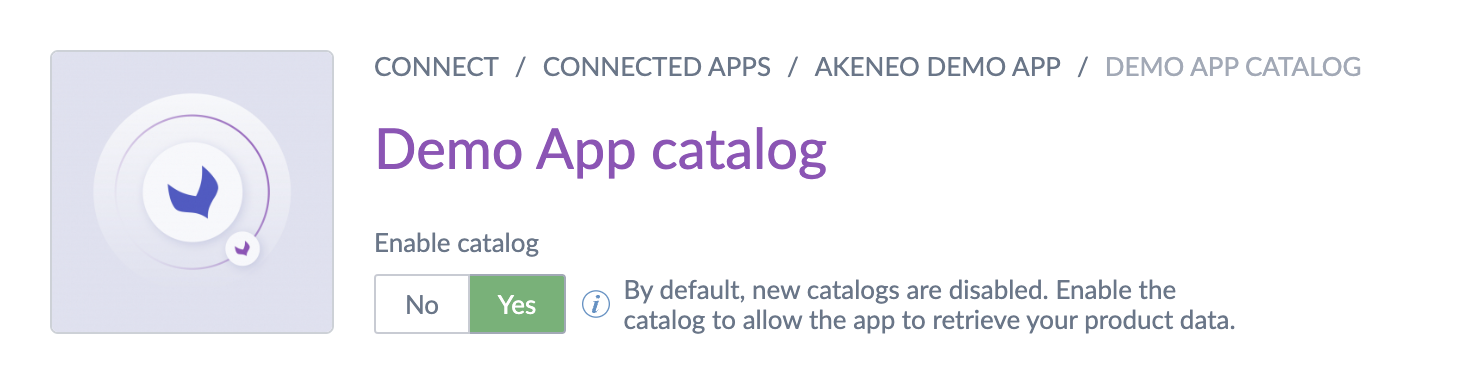
By default, new catalogs are disabled and only users can enable a catalog. It means that once a user has enabled it, you won't be able to retrieve products for this catalog.
To help your users, you can redirect them directly to the catalog configuration interface on their Akeneo Product Cloud using the following URL structure:
https://my-pim.cloud.akeneo.com/connect/apps/v1/catalogs/{catalog_uuid}
At any moment, you can verify if a catalog is enabled by calling the get catalog endpoint.
#Step 3: Get products using catalogs
Once you have an enabled catalog, paginate the related products using this endpoint.
#Next steps
- Learn how to use the product mapping feature
- Learn how to synchronize Akeneo data
- Explore the REST API reference
#Use the catalog product mapping
To further help you in your app development, you can use product mapping to push your data structure to Akeneo PIM and get pre-formatted product data.
#What you'll learn
After completing this tutorial, you'll be able to push your JSON mapping schema to the PIM and get product data in the format you expect.
#Requirements
- You have access to an Akeneo Product Cloud sandbox (Please refer to our app developer starter kit)
- Your app already manages the authorization process
- You followed the Getting started with catalogs steps
#Step 1: Define your JSON schema
The first step to using the mapping feature is determining the JSON schema you need to push to the Akeneo PIM to get mapped product data.
JSON Schema is a declarative language that allows annotating and validating JSON documents. It describes an existing data format, provides clear human- and machine-readable documentation, and allows to validate data which is useful for ensuring the quality of client-submitted data.
To help you define your schema, we advise you to use this online validator pre-configured with our latest meta-schema: jsonschemavalidator.net. The validator highlights errors if there are some or displays a success message if your schema matches all our meta-schema constraints.
You can also download the latest product mapping meta-schema - v1.0.3 (May, 2024) and the related product mapping schema example.
#Write a mapping schema
At the beginning of the schema, you must at least indicate the version of the meta-schema used and also ensure that the output JSON represents an object. :
    {
      "$schema": "https://api.akeneo.com/mapping/product/1.0.3/schema",
      "type": "object"
    }
Next, you must define a list of targets that you want to retrieve.
    {
      "$schema": "https://api.akeneo.com/mapping/product/1.0.3/schema",
      "type": "object",
      "properties": {
        "uuid": {
          "type": "string"
        },
        "name": {
          "title": "Product name",
          "type": "string"
        }
      }
    }
The uuid target, with a string type, is mandatory. It's a special target that is automapped on the PIM side.
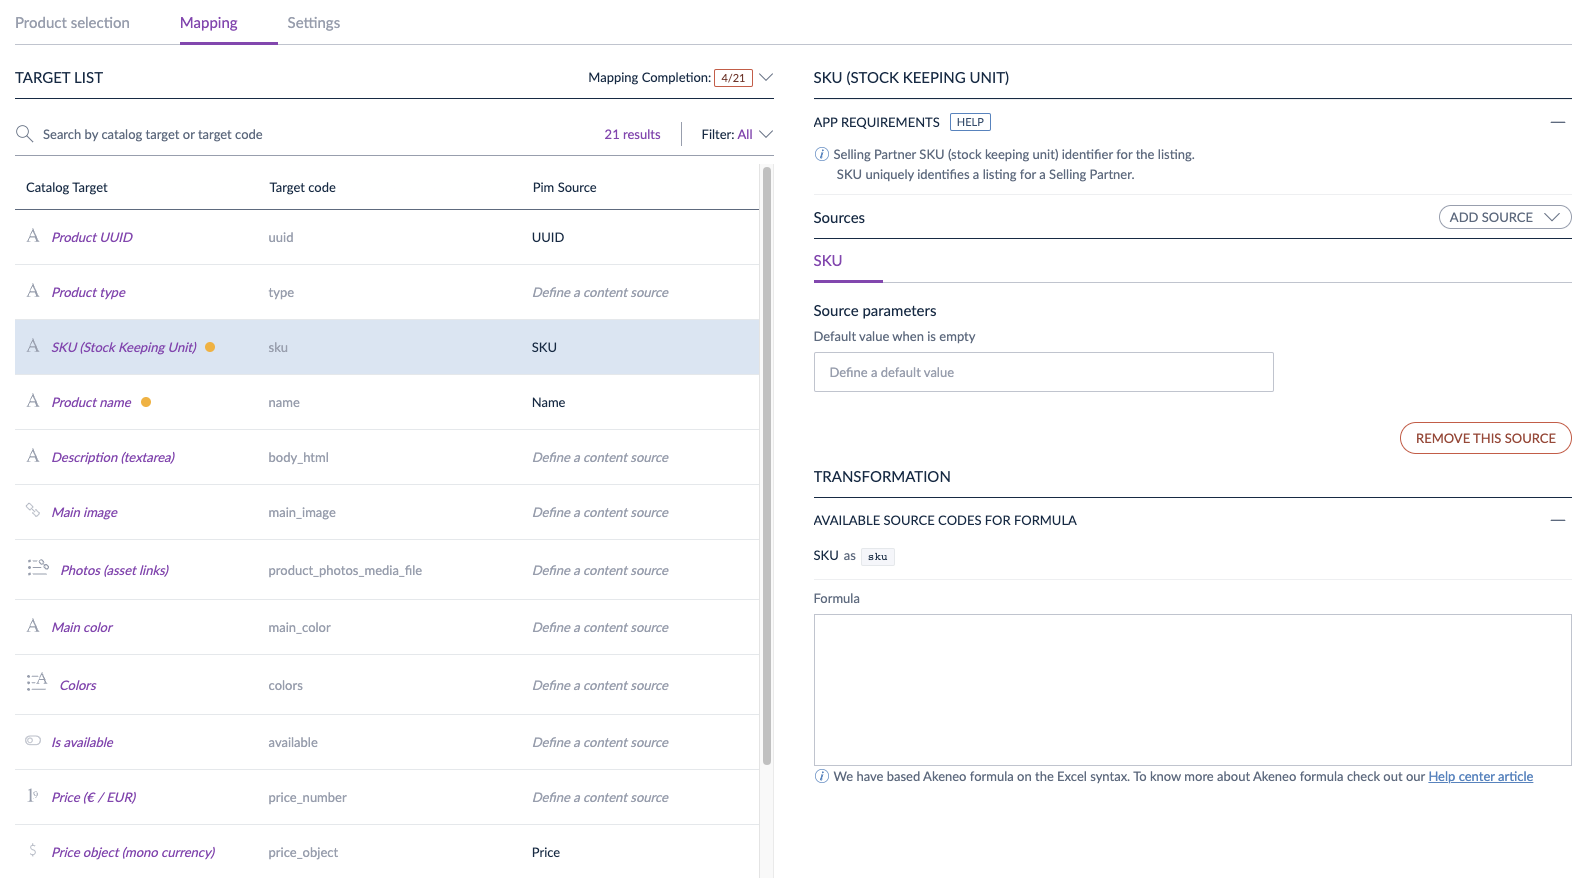
Next, you can create the targets you want. Each target must have at least a type. title is optional but can be useful because it's used as a label in the mapping UI on the PIM side.
There are three special targets that you can include in your schema:
pim_associations: retrieve associations
pim_parent: retrieve the parent model of a product
pim_root: retrieve the root model of a product
To use one of these targets, just copy/paste it from the example.
Please note that we don't return empty values.
When the mapped attribute is empty on the Akeneo PIM side, you won't receive the target property for this product in the API response.
#Step 2: Push your product mapping schema
Once your product mapping schema is ready, use the endpoint to create or update the product mapping schema related to a catalog to push your schema to the PIM and access the related configuration screen inside the PIM.
#Step 3: Get mapped product data
Finally, get product data using the three endpoints you could find here.
#Step 4: Test your implementation
To do so, please:
- Log into your developer sandbox
- Click
Connect,Connected apps,Catalogs, then the name of your catalog - Go to the
Product mappingtab - Fill in the mapping and enable the catalog using the
Enable catalogbutton in the catalog header
We use your product mapping schema to display a screen where your users will configure their catalog. Here is an example of an interface displayed using a JSON schema:
#Next steps
- Explore the REST API reference