The Event Platform
#Getting started
This guide provides a step-by-step walkthrough to help you set up event subscriptions using the Event Platform. By the end of this guide, you will have created a connection, authenticated your App, subscribed to events, and triggered an event from your PIM.
#Prerequisites
Before proceeding, ensure that you have an active App (it can be a Custom App or an active connection) to an Akeneo PIM.
To learn how to create a connection, see the Authentication Guide. If you're setting up a custom App, follow the steps in this tutorial to obtain an App token.
#Using Postman
The easiest way to manipulate the Event Platform API for a quickstart will be through our Postman Collection.
#1. Import the Postman Collection
- Download our Postman Collection
- Download our Postman environment variable template
- Import those files into Postman (follow this guide if you're not familiar with it)
#2. Fill the environment variables
The collection comes with a pre-script to deal with the authentication specificities when using a PIM Connection.
Fill the environment variables with your PIM connection values, and it will automatically generate a pim_access_token if the credentials you provide are valid.
You can leave subscriberId and subscriptionId blank for now.

(Click on the image to view it in full size)
#3. Create a Subscriber
- Select the Postman environment you've just created
- Send a
Create a SubscriberPOST request - Copy/Paste the newly created Subscriber id in your
subscriberIdenvironment variable
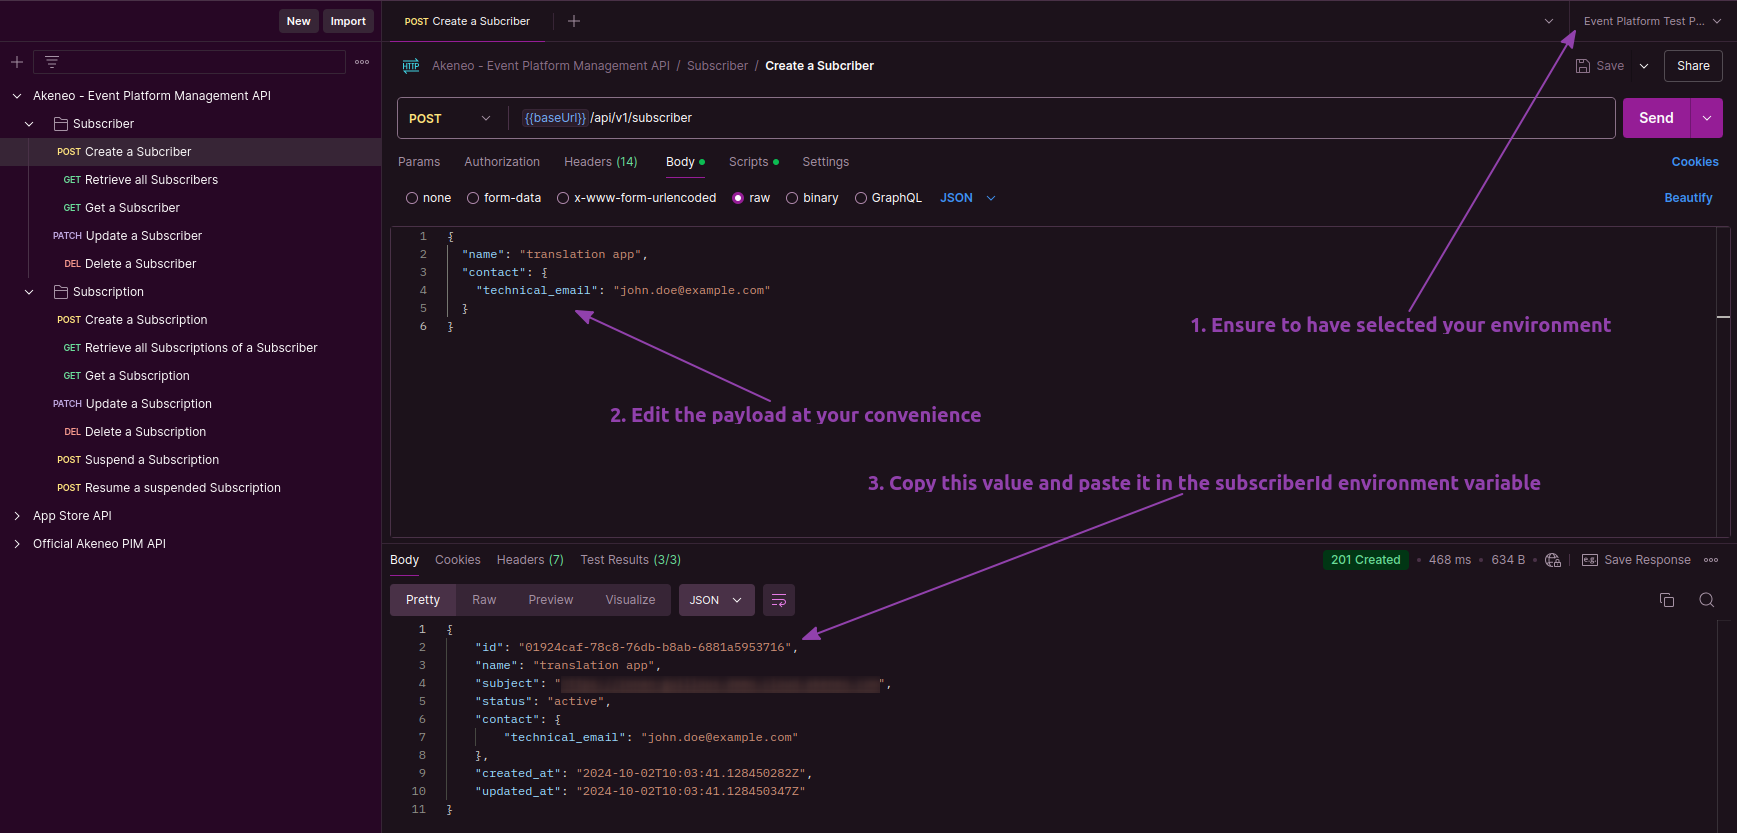
(Click on the image to view it in full size)
#4. Create a Subscription
- Change the https endpoint value to the url of your choice to receive events
- You can update the
eventsarray to receive more event types - Send a
Create a SubscriptionPOST request
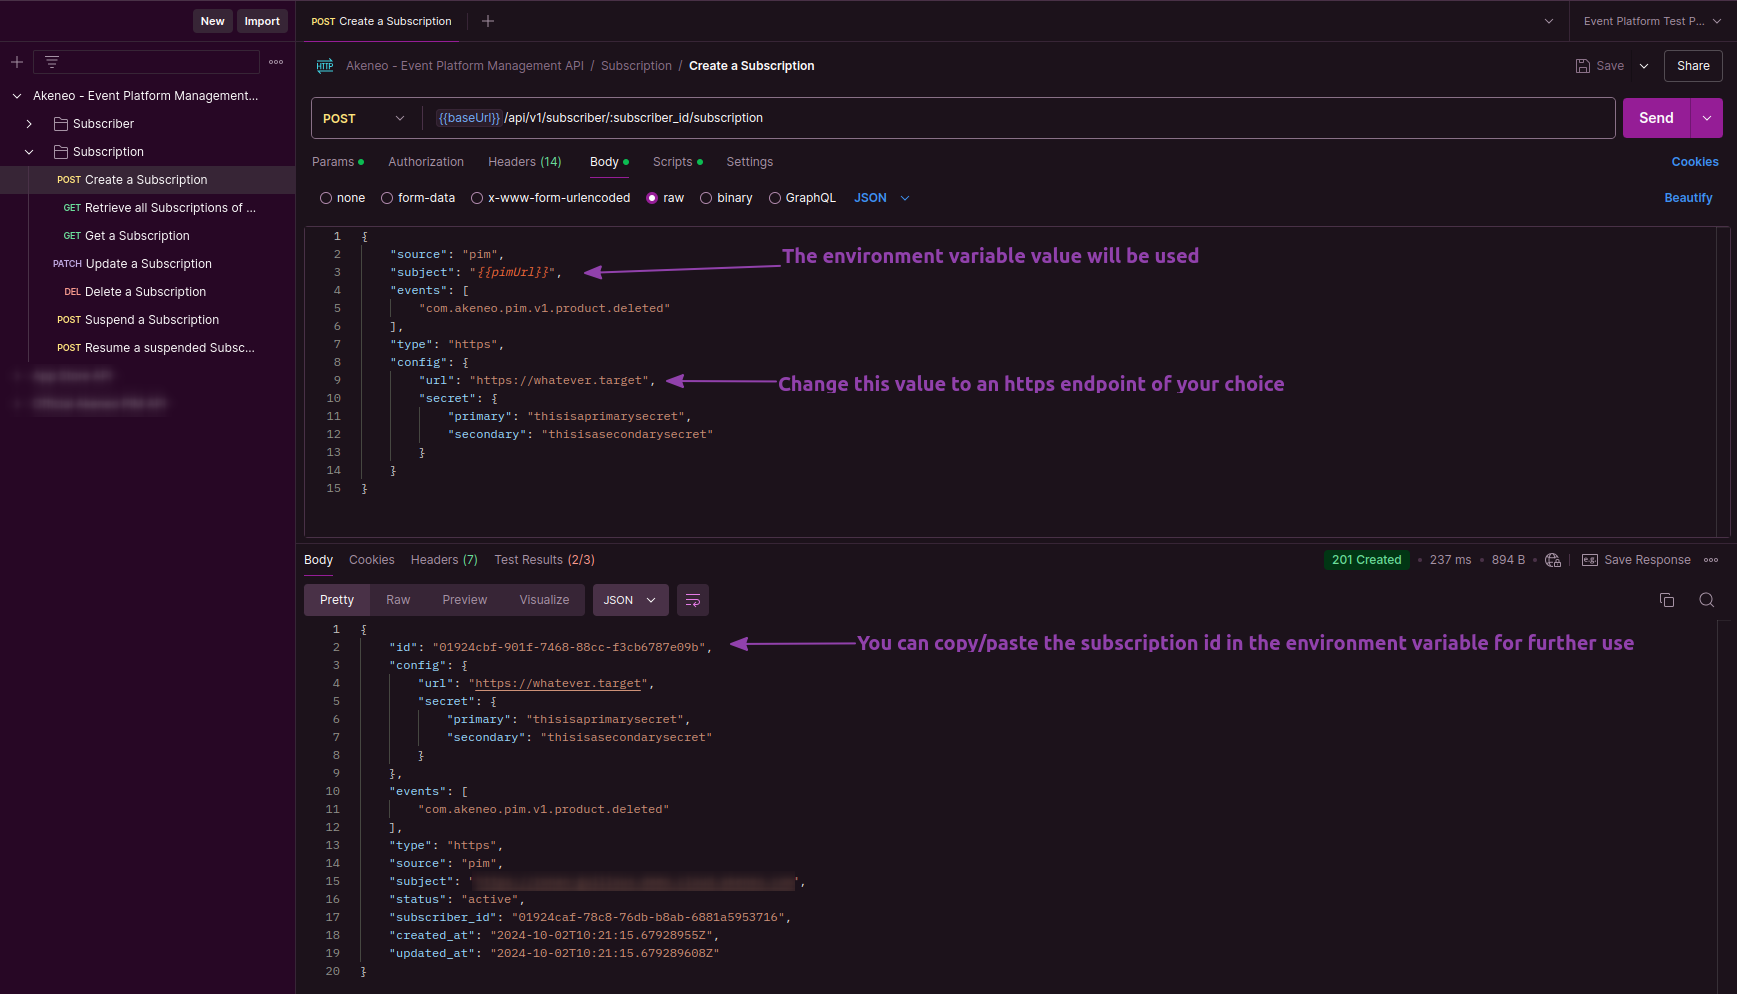
(Click on the image to view it in full size)
⏱️ Note: After creating or updating a subscription, there may be a delay of several minutes before it becomes fully active. This is due to synchronization between the subscription management service and the event delivery service. Wait a few minutes before triggering events to ensure proper delivery.
#5. Trigger an Event from the PIM
With your subscription in place, you're ready to trigger the event you subscribed to (in this example, com.akeneo.pim.v1.product.deleted). The simplest way to do this is by deleting a product directly within the Akeneo PIM UI. This approach allows you to trigger the event and manually observe the changes in real time.
After deleting the product, verify that the event was successfully triggered by checking the payload received at your destination URL.
#Using Curl
#1. Retrieve your credentials from your targeted PIM
🛠 For every call to the API, you will need X-PIM-TOKEN & X-PIM-CLIENT-ID.
In this example, we will create a new connection in the PIM and use it to generate an API token.
1. Create a connection in Akeneo PIM:
- Navigate to Connect > Connection settings > Create.
- Fill out the form to create the connection.
- Note the generated
Client ID,Secret,Username, andPassword.
2. Set Your Environment Variables:
- Define the Client ID, Secret, Username, Password, and Akeneo host URL as environment variables:
 export CLIENT_ID="your-client-id"
     export CLIENT_SECRET="your-client-secret"
     export API_USERNAME="your-API-username"
     export API_PASSWORD="your-API-password"
     export TARGET_PIM_URL="https://your-pim.cloud.akeneo.com"
Replace the placeholders with your actual credentials and host URL.
3. Encode Your Credentials:
- Encode the Client ID and Secret in base64 format, separated by a colon
::
     export BASE64_ENCODED_CLIENTID_AND_SECRET=$(echo -n "$CLIENT_ID:$CLIENT_SECRET" | base64 -w 0)
    // For Mac OS user remove the -w 0 option
4. Your API Token:
- Make the API call to retrieve your
API tokenusing the environment variables:
     curl --request POST "$TARGET_PIM_URL/api/oauth/v1/token" \
     --header "Content-Type: application/json" \
     --header "Authorization: Basic $BASE64_ENCODED_CLIENTID_AND_SECRET" \
     --data-raw '{
     "grant_type": "password",
     "username": "'"$API_USERNAME"'",
     "password": "'"$API_PASSWORD"'"
     }'
After retrieving the API token, store the access_token from the response in an environment variable:
     export PIM_API_TOKEN="..."
     // Replace with the actual token from the response
ℹ️ Note that the token has a lifespan of one hour.
🛠 You can also use a custom App if you like. As long as you have a client_id alongside an API token, you are good to go for the next step
#2. Create a Subscriber
From the next steps we will use the event platform REST API: 'https://event.prd.sdk.akeneo.cloud/api/v1'
You can create a subscriber once you have a valid PIM API token. A subscriber is an entity to which all of your subscriptions will be attached.
The technical_email is used to send emails about the subscription status (deleted, suspended, revoked)
    curl --request POST 'https://event.prd.sdk.akeneo.cloud/api/v1/subscribers' \
    --header "X-PIM-URL: $TARGET_PIM_URL" \
    --header "X-PIM-TOKEN: $PIM_API_TOKEN" \
    --header "X-PIM-CLIENT-ID: $CLIENT_ID" \
    --header 'Content-Type: application/json' \
    --data-raw '{
        "name": "example subscriber name",
        "contact": {
            "technical_email": "subscriber.test.email@example.com"
        }
    }'
Response Example :
    {
        "id": "01905a84-a3b7-766e-a49f-5519c35fa7a0",
        "name": "example subscriber name",
        "subject": "https://your-pim.cloud.akeneo.com",
        "status": "active",
        "contact": {
            "technical_email": "subscriber.test.email@example.com"
        },
        "created_at": "2024-06-27T16:26:00.503422Z",
        "updated_at": "2024-06-27T16:26:00.503422Z"
    }
After creating the subscriber, store the ID from the response in an environment variable:
export SUBSCRIBER_ID="01905a84-a3b7-766e-a49f-5519c35fa7a0" # Replace with the actual ID from the response
#3. Create a Subscription
With a subscriber in place, the next step is to create a subscription to specify which events you want to receive. In this example, we will use an HTTPS destination (HTTPS is mandatory for secure communication). To create a subscription, you will need a destination URL.
export DESTINATION_URL="https://my-destination-url.com" # Replace with your destination URL
If you have already configured the Events API, do not use the same URL for your destination URL; otherwise, you will not receive events from the event platform.
💡 You don’t have to worry about the secret part of the configuration for now, they are used to sign the payload (more information below in the API presentation section)
    curl --request POST "https://event.prd.sdk.akeneo.cloud/api/v1/subscribers/$SUBSCRIBER_ID/subscriptions" \
    --header "X-PIM-URL: $TARGET_PIM_URL" \
    --header "X-PIM-TOKEN: $PIM_API_TOKEN" \
    --header "X-PIM-CLIENT-ID: $CLIENT_ID" \
    --header 'Content-Type: application/json' \
    --data-raw '{
        "source": "pim",
        "subject": "'"$TARGET_PIM_URL"'",
        "events": [
            "com.akeneo.pim.v1.product.updated"
        ],
        "type": "https",
        "config": {
            "url": "'"$DESTINATION_URL"'",
            "secret": {
                "primary": "averysecretprimarysecret",
                "secondary": "you can leave empty here, only use to ease your secret rotation use cases"
            }
        }
    }'
⏱️ Note: After creating or updating a subscription, there may be a delay of several minutes before it becomes fully active. This is due to synchronization between the subscription management service and the event delivery service. Wait a few minutes before triggering events to ensure proper delivery.
#4. Trigger an Event from the PIM
With your subscription in place, you're ready to trigger the event you subscribed to (in this example, com.akeneo.pim.v1.product.updated). The simplest way to do this is by updating a product directly within the Akeneo PIM UI. This approach allows you to trigger the event and manually observe the changes in real time.
Alternatively, you can also update a product using the Akeneo PIM REST API if you prefer an automated approach.
After updating the product, verify that the event was successfully triggered by checking the payload received at your destination URL.