Extensions
#Types
UI extensions are categorized by type, which determines their capabilities. Select the type that best suits your requirements:
- Action
- Iframe
- Link
- Data component
#Link
A link UI extension is crafted to open your external content in a new tab.
To create a link UI extension, mandatory fields are name, position, type, and configuration. Inside configuration, mandatory options are default_label and url.
#Iframe
An iframe UI extension allows to open your external content inside the PIM thanks to an iframe.
An iframe (inline frame) is an HTML element that allows you to embed another HTML document within the current document. It is commonly used to display content from another source, such as a webpage, video, or interactive content, without leaving the current page.
For more detailed information, you can refer to the Mozilla Developer Network (MDN) documentation on iframes.
To configure an iframe UI extension, mandatory fields are name, position, type, and configuration. Inside configuration, mandatory options are default_label, secret and url.
Important security notice
For sensitive data, we recommend implementing security measures to protect your information.
#Default query parameters
To help identify the iframe caller (insecure) and context, several parameters are sent by default as SearchParameters in the GET query.
For example, when url is https://customerwebsite.com/iframe/, the called URL is https://customerwebite.com/iframe/?position=pim.product.tab&user[username]=julia
For all positions, parameters relative to the connected user, the extension position and the tenant are sent:
user[uuid]user[id]user[username]user[email]user[ui_locale]user[catalog_locale]except forpim.product-grid.action-baruser[catalog_scope]except forpim.product-grid.action-barpositiontenant
For pim.product.tab position, these parameters are sent:
product[uuid]product[identifier]
For pim.product-model.tab and pim.sub-product-model.header position, this parameter is sent:
product[code]
For pim.category.tab position, this parameter is sent:
category[code]
#Get PIM data from the iframe
For the product grid action bar position (pim.product-grid.action-bar), passing product or product model information through query parameters is not ideal, as it can result in excessively long URLs. To address this issue, we opted to use the PostMessage to transmit this information instead.
After the iframe is loaded, the PIM send an event which is a normalized message MessageEvent with a field data containing our information.
This field contains :
- A
dataobject with :- A
productUuidsfield which is an array of string representing the UUIDs of selected products - A
productModelCodesfield which is an array of string representing the codes of selected product models and sub models
- A
- A
contextobject containing the configuredlocaleandchannel. - A
userobject containing theuuid,usernameandgroupsof the connected user.
Example :
{
      "data": {
        "productUuids": [
          "63139bf3-a7f7-4eaa-ba5e-6ffc8a2f14e9",
          "6fa3bd36-6b5a-4e80-afcd-c224fdf6f3ea",
          "78f38e4a-8d25-41e1-8e09-42a9c246689a"
        ],
        "productModelCodes": []
      },
      "context": {
        "locale": "en_US",
        "channel": "ecommerce"
      },
      "user": {
        "uuid": "4ebad9a4-7728-4d90-9db0-9e5a5c6a4d45",
        "username": "admin",
        "groups": [
          "IT support",
          "All"
        ]
      }
    }
For a classical project with HTML and JavaScript code, you can include this kind of code to catch those events :
    <script>
            window.addEventListener('message', (event) => {
                console.log(event)
            });
        </script>
For more modern technologies like ReactJS, the iframe could be loaded before components. To solve this problem we added the possibility to ask for the data. To do this, just send a PostMessage with an object containing the property type: 'request_context'.
Example :
    window.parent.postMessage(
          {
            type: 'request_context'
          },
          "*"
        );
After receiving this event, the PIM will send a PostMessage event, similar to the one sent after the iframe loading.
#Product and product model context change
The PIM context is propagated within the iframe when it changes using postmessage. This only applies to the product and product model positions: pim.product-model.header, pim.sub-product-model.header and pim.product.header.
The message contains :
- A
contextobject containing the selectedlocaleandchannel. - A
userobject containing theuuid,usernameandgroupsof the connected user.
Example :
{
      "context": {
        "locale": "en_US",
        "channel": "ecommerce"
      },
      "user": {
        "uuid": "c71228d3-695c-4ded-8f3d-b3ed881a1f59",
        "username": "admin",
        "groups": [
          "IT support",
          "All"
        ]
      }
    }
#Reloading the parent page from the iframe
In some cases, after executing an action within the iframe, you may need to refresh the parent PIM page to reflect the changes made. Due to browser security constraints, direct access to the parent window is restricted.
To address this, we provides a mechanism to trigger a page reload via a PostMessage. To initiate a reload of the parent page, simply send a message from the iframe with the following structure:
    window.parent.postMessage(
          {
            type: 'reload_parent'
          },
          "*"
        );
This message will trigger a page reload in the PIM.
#Ensuring security of embedded iframes
To help ensuring the security of iframes we recommand using these two solutions:
- Properly configure Content Security Policy (CSP) headers to control the sources from which content can be loaded.
Please note that if these headers are misconfigured, iframe functionality may not work as intended.
- Use your extension secret and
postMessageto get and verify the signature of a JW token. This secret will be used to generate a JWT token when the iframe is loaded by the PIM system.
Get a JW Token via postMessage
First, from your iframe, you must request for the JWT by doing a PostMessage with a payload containing type: 'request_jwt'
Example :
    window.parent.postMessage(
          {
            type: 'request_jwt'
          },
          "*"
        );
the PIM will then answer with a postMessage containing the JWT token. The message will be structured as follows:
{
      "type": "JWT_TOKEN",
      "token": "jwt_value"
    }
- The JWT token in the token field is generated using SHA256 encryption based on the secret you provided.
For more information on how JWT tokens are structured and used, you can refer to the associated RFC 7519.
JWT Token Structure
The JWT token consists of three main parts: the header, the body (payload), and the signature.
Header
- The header typically contains information about the token type and the signing algorithm. In this case, it will look like:
{
      "typ": "JWT",
      "alg": "HS256"
    }
Payload
- The payload contains the claims. The JWT token’s will look like this:
{
      "jti": "c1b6b9f1-8486-4f9e-9f96-8d1b40fccb65",
      "iat": 1743410036.116152,
      "exp": 1743413636.116162,
      "userId": "1",
      "userUuid": "557ed4c9-e155-4f4c-802d-4d90bca37d45"
    }
jtiThe unique identifier for the token.iatThe issued at time.expThe expiration time of the token.userIdThe PIM user legacy identifier (in this case,1).userUuidThe PIM user Uuid.
A signature
- The signature is used to verify that the token is valid and has not been tampered with. It is generated by combining the encoded header and payload, and then signing them with the secret key. The resulting signature might look like:
9WBB7ayP8UnFrOlMrI9NzTj3kxaiXOWJzElyacEKt48
Verifying the Signature
To ensure that the JWT token was issued by Akeneo, you can verify the signature by re-encoding the header and payload and then signing them using the same secret key. This will allow you to confirm that the token is valid and has not been altered.
#Action
An action UI extension is designed to perform external tasks in the background. Please note the following key points regarding its functionality:
- Single execution: An action cannot be executed multiple times simultaneously. This ensures that tasks are processed in a controlled manner.
- Menu deactivation: During the execution of an action, the associated menu will be deactivated to prevent further interactions until the task is complete.
- Notification on completion: A notification will appear once the external server responds to the request, keeping users informed of the task's status.
- Timeout: The PIM HTTP client that communicates with the destination is configured with a timeout of 5 seconds.
- POST HTTP method: The request being sent to the destination is a POST request.
- Signature: It's possible to configure a
secretto sign the body of the POST request sent to the destination (SHA-512 protocol).
Here is a diagram illustrating the workflow:
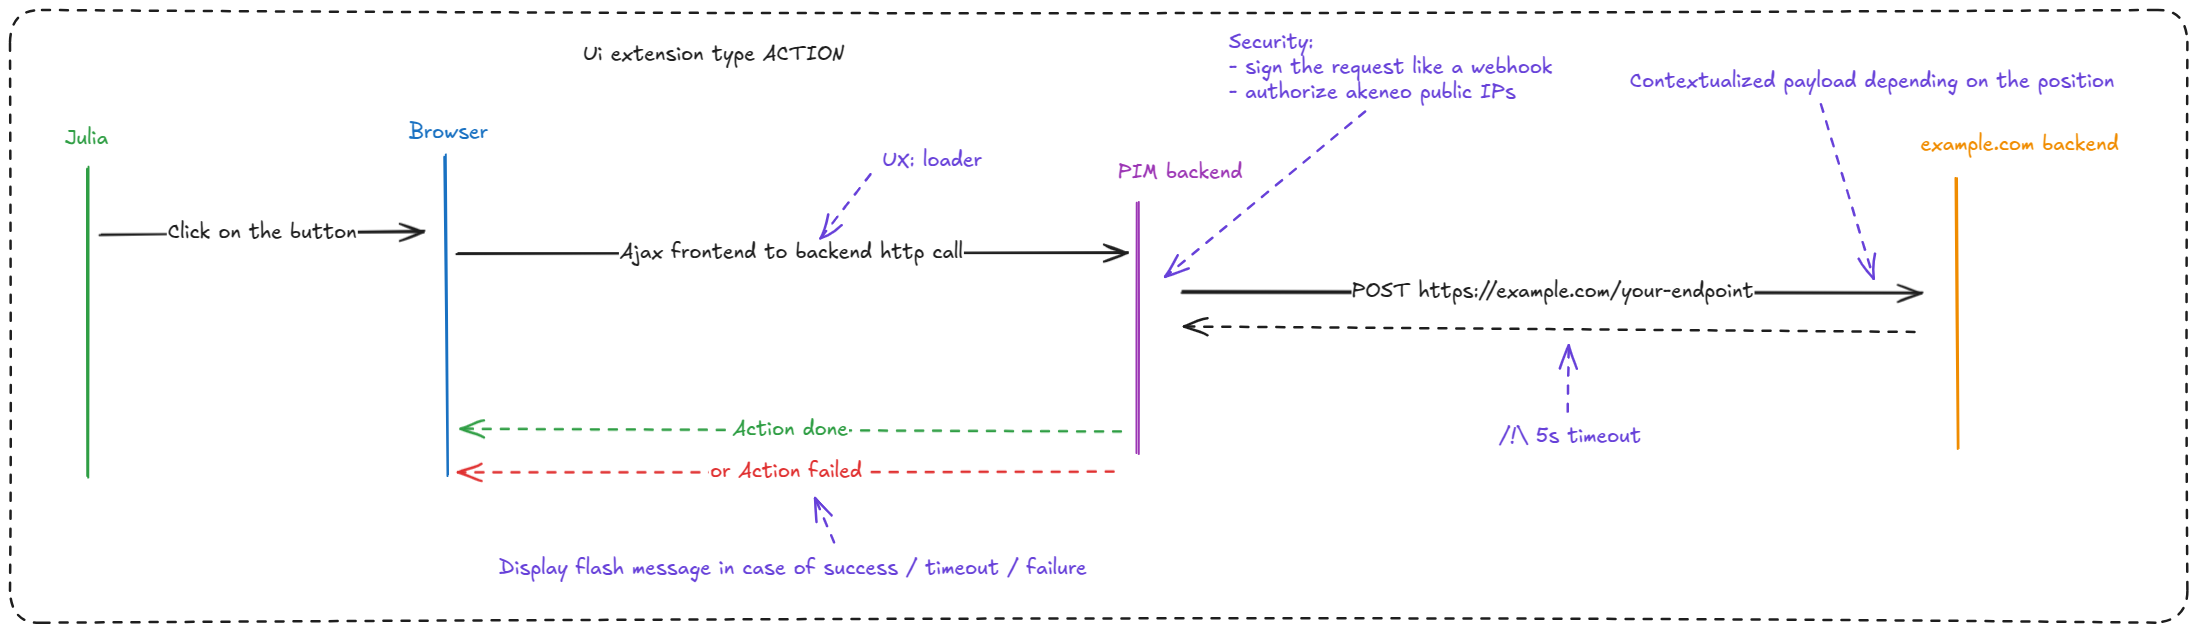
Data sent within the POST body, formatted in JSON, contain:
- A
dataobject with different fields depending on the position. - A
contextobject containing:- the configured
locale, - the configured
channel, - the configured
category(only available for product grid actions).
- the configured
- A
userobject containing theuuid,usernameandgroupsof the connected user. - A
timestampthat can be used with a secret to help you to protect your server against replay attacks.
From the position pim.product.header, the data object contains:
- A
productUuidstring field
From the position pim.product-model.header, the data object contains:
- A
productModelCodestring field representing the root model code.
From the position pim.sub-product-model.header, the data object contains:
- A
productModelCodestring field representing the sub model code.
From the position pim.product-grid.action-bar, the data object contains:
- A
productUuidsfield which is an array of string representing the UUIDs of selected products - A
productModelCodesfield which is an array of string representing the codes of selected product models and sub models
From the position pim.product.index, the data object is empty.
Examples :
{
      "data": {
        "productUuid": "ecfddba2-59bf-4d35-bd07-8ceeefde51fd"
      },
      "context": {
        "locale": "en_US",
        "channel": "ecommerce"
      },
      "user": {
        "uuid": "e05cc457-b8ac-43b1-baa7-c4c112091ad8",
        "username": "julia",
        "groups": [
          "Manager",
          "All"
        ]
      },
      "timestamp": 1739948408
    }
{
      "data": {
        "productUuids": [],
        "productModelCodes": ["armor", "apollon"]
      },
      "context": {
        "locale": "en_US",
        "channel": "ecommerce",
        "category": "master_men_blazers_deals"
      },
      "user": {
        "uuid": "e05cc457-b8ac-43b1-baa7-c4c112091ad8",
        "username": "julia",
        "groups": [
          "Manager",
          "All"
        ]
      },
      "timestamp": 1739948408
    }
#Data component
A data component UI extension is designed to query data from an predefined endpoint and display them in a colapsible panel on the product edit form. It aims to ease the completion of product information without leaving the PIM. The panel is accessible via a button on the header of the form. It can be opened and closed by clicking the button.
Please note the following key points regarding its functionality:
- Raw data display: The extension expect queried data to be of JSON format and will display it as it is. To ease navigation, section are collapsible.
- GET HTTP method: The request being sent to the destination is a GET request.
- Signature: It's possible to configure a secret to sign the body of the POST request sent to the destination (SHA-512 protocol).
- Authenticated calls: Thanks to the possibilty of adding credentials to the extension, you are able to query endpoints requiring authentication.
#Url Placeholders
The Url of a link UI extension, an action, or a data component can be based on the context thanks to a placeholder pattern.
For example, you can configure a UI extension with the following url https://www.google.com/search?q=%name%&tbm=shop&gl=us. When the link is clicked, %name% will be replaced with the context attribute values.
Valid placeholders attributes are:
uuid(for products),code(for product models) and other attribute of typeidentifier- all
textattributes. Links will use the value related to the current locale or channel.
You can add a placeholder anywhere in your url as soon as they're surrounded by % symbol.
Examples:
https://www.google.com/search?q=%name%https://yourwebsite.com/%sku%%base_url%/sub-url
If the URL begins with a placeholder, we won't verify its validity. The link might not work when used.